Monday, December 20, 2010

Get Excel Sheet Names In Asp.net

In Previous article named Reading Excel File in Asp.net , we discussed about Uploading excel file with One sheet, where we assumed that we know the name of the sheet i.e. Reading from "Sheet1" of uploaded excel file.(Demo Code)

In this article we will discuss to read data from excel file where are not sure about the number of Sheets present in Excel file and name of those excel sheet. This is very common requirement for developers who are playing with Excel Data. We will keep logic of Uploading file similar to previous article. In this article we assume that we have uploaded the file and saved it at predefined location. Now we will only consider reading from excel file which contains number of excel sheets with names not known to us.


Just check out following code, where we consume excel file and read all Sheet names as Table names in one Data Table, and then display all Excel sheets one by one.

public DataSet GetExcelData(string ExcelFilePath)
    {
        string OledbConnectionString = string.Empty;
        OleDbConnection objConn = null;
        OledbConnectionString = "Provider=Microsoft.ACE.OLEDB.12.0;Data Source=" + ExcelFilePath + ";Extended Properties=Excel 8.0;";
        objConn = new OleDbConnection(OledbConnectionString);

        if (objConn.State == ConnectionState.Closed)
        {
            objConn.Open();
        }
        DataSet objDataset = new DataSet();

        DataTable dtName = objConn.GetOleDbSchemaTable(OleDbSchemaGuid.Tables, null);
        
        for (int _rowCount = 0; _rowCount < dtName.Rows.Count; _rowCount++)
        {
            Response.Write(dtName.Rows[_rowCount]["TABLE_NAME"].ToString() + "
");

            OleDbCommand objCmdSelect = new OleDbCommand("Select * from [" + dtName.Rows[_rowCount]["TABLE_NAME"].ToString() + "]", objConn);
            OleDbDataAdapter objAdapter = new OleDbDataAdapter();
            objAdapter.SelectCommand = objCmdSelect;
            objAdapter.Fill(objDataset, dtName.Rows[_rowCount]["TABLE_NAME"].ToString());
            objAdapter.Dispose();
            objCmdSelect.Dispose();
        }

        objConn.Close();
        return objDataset;

    }

We are simply reading all excel sheets present in the Excel file and adding them in Data Set.
Check out Demo code for the reference. Getting Excel sheet Names in Asp.net is an easy task. We can simply bind this data to grids and display it or push this data directly to database.

We need to note one thing, that sheet names in Excel are read as "SheetName + $", where "$" does not belong to sheet name.

If we need to do operations related to Range of Excel sheet Cells, refer my previous article

Download Demo Code here --> GetExcelSheetNamesInAsp.zip Submit this story to DotNetKicks

Read more...

Wednesday, December 8, 2010

Reading Excel File in Asp.net

One of the very common requirement in asp.net is end user uploaded Excel file and in Code behind, we need to Read the uploaded Excel file and Make sense out of data, i.e. Reading Excel File in Asp.net (Demo Code). 

Reading Excel File in Asp.net is Very simple task, but if there are standard operations need to be done, then we have to specify the Excel format and ask end user to upload file in certain format only.

Below we will discuss how to read and Excel File. (Demo Code)

Before we go ahead check out folder structure of Read Excel File in Asp.net

Also after we upload excel file it gets bind to a grid view, all these operations are done in Default.aspx


Html of the Default.aspx page is as below

Select Date :
Upload Excel File :

On Click of Upload Button we upload excel file and Save it in UploadedFiles folder. We then Read file from UploadedFiles folder.
C# code on Upload Button click is as below, code is very easy to understand, you can also download Demo Code for reference.

protected void btnUpload_Click(object sender, EventArgs e)
    {
        
        if (FileUpload1.FileName.ToString() != "" && FileUpload1.ToString().Contains("."))
        {
            String filepath = Server.MapPath("UploadedFiles");
            FileUpload1.SaveAs(filepath + "\\" + FileUpload1.FileName.Split('\\')[FileUpload1.FileName.Split('\\').Length - 1]);
            string excelPath = (filepath + "\\" + FileUpload1.FileName.Split('\\')[FileUpload1.FileName.Split('\\').Length - 1]);

            ExcelGridView.DataSource = GetExcelData(excelPath);
            ExcelGridView.DataBind();
        }
    }

In above code we pass Excel Path to "GetExcelData" function which returns DataTable which we in turn bind to GridView
GetExcelData function is as below

public DataTable GetExcelData(string ExcelFilePath)
    {
        string OledbConnectionString = string.Empty;
        OleDbConnection objConn = null;
        OledbConnectionString = "Provider=Microsoft.ACE.OLEDB.12.0;Data Source=" + ExcelFilePath + ";Extended Properties=Excel 8.0;";
        objConn = new OleDbConnection(OledbConnectionString);

        if (objConn.State == ConnectionState.Closed)
        {
            objConn.Open();
        }

        OleDbCommand objCmdSelect = new OleDbCommand("Select * from [Sheet1$]", objConn);
        OleDbDataAdapter objAdapter = new OleDbDataAdapter();
        objAdapter.SelectCommand = objCmdSelect;
        DataSet objDataset = new DataSet();
        objAdapter.Fill(objDataset, "ExcelDataTable");
        objConn.Close();
        return objDataset.Tables[0];

    }

In above Code check out OleDbCommand; we are just writing a select query which fetch data from Sheet1 of uploaded Excel, similarly if we can give Sheet Name instead of Sheet1. If your Excel Data starts from some other cell then change select query like "Select * from [Sheet1$B7:F200]"; first row of this range will come as columns in Data Table
Now we are done with Excel Upload and Reading the file, there are certain things which we needs to be take care before uploading Excel file which are as below
  • It certain column in Excel contains number do format that Column for number and make sure all the entries in that column are number, if some entries are in text format then, in Data Table we get those entries as blank entries (i.e. DataTable has empty cell for that respective excel cell.)
  • Define the Range of Operation if your data does not start from A1 cell.
  • All cells in 1st row (i.e. First row of the range you specify) are considered as column name, and in C# Data Table they appear as exact.
  • To Specify the Range modify select query as Select * from [Sheet2$B7:F200] ; you can use your own sheet name instead of Sheet1 or Sheet2
Download Ready to Use Demo Code -- > ReadExcelFileInAsp.Net.zip
    Submit this story to DotNetKicks

    Read more...

    Monday, November 22, 2010

    Google Charts API for ASP.NET

    Google Visualization has provided a powerful set of JavaScripts which allows us to develop various graphs and charts. I think if we are developing something like dashboard or something like Google Analytic dashboard, then using Google Visualizations is amazing idea. In case of Asp.net we can simply develop a logic to use DataTables as input and Graph will be generated automatically. Again we can capture the click events for the graph and display alerts or run some JavaScript as per our logic (DemoCode).

    In this article we will simply check out different graphs and its integration with asp.net. Check out following Screen shots.


    Google Charts API can be implemented effectively in Asp.net, this is just a small part of actual assignment I did for the development of a dashboard.
    Step 1: Understanding Table structure of Google API.Google Charts API accepts table as input and generate graphs accordingly. It takes Table in Following format. (for more information check out  Google References )


    We should be careful while generating Table in HTML, i.e. while adding Rows and Columns in Google DataTable. Google Data Table creation looks as follows

    var data = new google.visualization.DataTable();
            data.addColumn('string', 'Name');
            data.addColumn('number', 'Salary');
            data.addRows(4);
    
    There are many things we can do with Google Table which I am not including in this article.

    Check out following JavaScript code for creating Google Table and Adding data in it
    var data = new google.visualization.DataTable();
       function setDataforGraph()
            {
             // Create and populate the data table.
           var raw_data =  [['INFOSYS', 3077.15, 3081.65, 3015.9, 3059.80, 3082.65, 3054.65, 2997.85, 3030.05, 2970.95, 3003.95]];
                var xAxis = ['05-Nov-10', '08-Nov-10', '09-Nov-10', '10-Nov-10', '11-Nov-10', '12-Nov-10', '15-Nov-10', '16-Nov-10', '18-Nov-10','19-Nov-10'];
    
                data.addColumn('string', 'Date');
                for (var i = 0; i < raw_data.length; ++i) {
                    data.addColumn('number', raw_data[i][0]);
                }
                
                data.addRows(xAxis.length);
                for (var j = 0; j < xAxis.length; ++j) {
                    data.setValue(j, 0, xAxis[j].toString());
                }
                for (var i = 0; i < raw_data.length; ++i) {
                    for (var j = 1; j < raw_data[i].length; ++j) {
                        data.setValue(j - 1, i + 1, raw_data[i][j]);
                    }
                }
              
            }
    

    We also need to include JavaScript sources, there are some packages Google Provides, as we are going to use this for Charts we include coreCharts
    Add script file "http://www.google.com/jsapi"


    Once we done with DataTable creation we go for the logic to display Charts. We need to call Google Function

    function drawVisualization(Type) {
    
                // Create and draw the visualization.
                var targetDiv = document.getElementById('visualization');
                var chart;
                if(Type == "ColumnChart") chart = new google.visualization.ColumnChart(targetDiv);
                else if(Type == "PieChart") chart = new google.visualization.PieChart(targetDiv);
                else if (Type == "AreaChart") chart = new google.visualization.AreaChart(targetDiv);
                else if (Type == "BarChart") chart = new google.visualization.BarChart(targetDiv);
                else if(Type == "LineChart") chart = new google.visualization.LineChart(targetDiv);
                chart.draw(data);
                new google.visualization.events.addListener(chart, 'select', selectionHandler);
    
                function selectionHandler(e) {
                    selection = chart.getSelection();
                    for (var i = 0; i < selection.length; i++) {
                        var item = selection[i]; 
                        alert(data.getValue(item.row, 1));
                    }
                }
            }
    

    Above function can be called on any event. Which will generate Chart of Particular Type. Refer Demo Code. We can add selectionHandler to capture events on click of chart. Above function will give us value of the Item i.e. Data. Check out following image.


    HTML Structure of form is something like below, where we have Div tag for Google Visualization.

    At this point we are done with the Google Charts API usage in HTML. Now to make Google Charts work in asp.net we simply need to develop a logic in code behind which will enable us to Create GoogleDataTable.

    To generate data in code behind we use string elements which we can simple get in JavaScript on page render.

    public string x_Axis = string.Empty;
        public string graphTable = string.Empty;
    
        protected void Page_Load(object sender, EventArgs e)
        {
            if (!IsPostBack)
            {
                graphTable = getGoogleVisualizationStr(DemoDataTable);
                x_Axis = "'05-Nov-10', '08-Nov-10', '09-Nov-10', '10-Nov-10', '11-Nov-10', '12-Nov-10', '15-Nov-10', '16-Nov-10', '18-Nov-10','19-Nov-10'";
            }
        }
    

    We keep Demo Table in c# code, with same data values used in above table.
    private DataTable DemoDataTable
        {
            get
            {
                DataTable DT = new DataTable();
                DT.TableName = "GENERAL";
                DT.Columns.Add(new DataColumn("Name", typeof(string)));
                DT.Columns.Add(new DataColumn("Data1", typeof(long)));
                DT.Columns.Add(new DataColumn("Data2", typeof(long)));
                DT.Columns.Add(new DataColumn("Data3", typeof(long)));
                DT.Columns.Add(new DataColumn("Data4", typeof(long)));
                DT.Columns.Add(new DataColumn("Data5", typeof(long)));
                DT.Columns.Add(new DataColumn("Data6", typeof(long)));
                DT.Columns.Add(new DataColumn("Data7", typeof(long)));
                DT.Columns.Add(new DataColumn("Data8", typeof(long)));
                DT.Columns.Add(new DataColumn("Data9", typeof(long)));
                DT.Columns.Add(new DataColumn("Data10", typeof(long)));
                DT.Rows.Add(new object[] { "INFOSYS", 3077.15, 3081.65, 3015.9, 3059.80, 3082.65, 3054.65, 2997.85, 3030.05, 2970.95, 3003.95 });
                return DT;
            }
        }
    

    We write a simple code to generate rowData used in above lines of code.

    private string getGoogleVisualizationStr(DataTable DT)
        {
            string googleVisualTable = string.Empty;
            googleVisualTable = "[";
            for (int i = 0; i < DT.Rows.Count; i++)
            {
                for (int j = 0; j < DT.Columns.Count; j++)
                {
                    if (j == 0)
                    {
                        googleVisualTable += "[ '" + DT.Rows[i][j] + "'";
                    }
                    else if (j == DT.Columns.Count - 1) googleVisualTable += "," + DT.Rows[i][j] + "]";
                    else googleVisualTable += "," + DT.Rows[i][j];
    
                }
                if (i != DT.Rows.Count - 1) googleVisualTable += ",";
            }
            googleVisualTable += "]";
            return googleVisualTable;
        }
    
    We replace our JavaScript code with
    var raw_data = <%= graphTable %>
    var xAxis = [<%=x_Axis %>];
    

    Thats it we are done with development of Google Charts API for ASP.NET. Above code used data of only one company to keep things simple. To add more companies simply add it in data table. So that our graphs will look like


    Download Democode for reference --> GoogleVisualizationDemo.zip Submit this story to DotNetKicks

    Read more...

    Wednesday, November 3, 2010

    Generate captcha image in asp.net - simple way

    When it comes to captcha images simple question pops in i.e. how to generate captcha images?
    This article is about generating Captcha image in asp.net, this is very simple logic which can be implemented immediately for any website. You can directly Download Demo and use it.
    We have used following simple steps to Generate Captcha Image in asp.net
    1. Create Captcha Image from random numbers and store that number in session variable, we have used Captcha.aspx page for the same.
    2. Use Captcha.aspx as source for the captcha image in Default.aspx page, i.e. for image tag give Captcha.aspx as SRC.
    3. On Submit click simply verify captcha entered by user and captcha in session. 
    Our folder structure is very simple, check out following image


    To understand the way we have checked captcha, have look on HTML of Default.aspx page (Check out DemoCode, for better understanding.)


    Catptcha Text


    Check out the way we have used Captcha.aspx page in image source.

    On submit click we simply checks whether Captcha entered in "txtCaptcha" is valid or not, we have following code for submit button clicked.

    protected void btnSubmit_Click(object sender, EventArgs e)
        {
            if (Session["Captcha"] != null)
            {
                if (txtCaptcha.Text == Session["Captcha"].ToString())
                {
                    Response.Redirect("RedirectPage.aspx");
                }
                else
                {
                    Response.Write("Please Enter Valid Captcha code");
                    txtCaptcha.Text = "";
                }
            }
            else
            {
                Response.Write("Session Expired, please re-enter Captcha.");
            }
        }
    

    Now what remains is the logic for Generate captcha image, we don't have any HTML tags on captcha.aspx, we simply write following code for Binary Image Generation and write it. We have used Random number; but we can have our different logic for the same.

    protected void Page_Load(object sender, EventArgs e)
        {
            Response.ContentType = "text/plain";
            Random random = new Random(DateTime.Now.Millisecond);
    
            int number = random.Next(100000);
    
            Session.Add("Captcha",number.ToString());
    
            System.Drawing.Bitmap bmpOut = new Bitmap(100, 50);
    
            Graphics graphics = Graphics.FromImage(bmpOut);
    
            graphics.InterpolationMode = System.Drawing.Drawing2D.InterpolationMode.Bilinear;
    
            graphics.FillRectangle(Brushes.Aquamarine, 0, 0, 100, 50);
    
            graphics.DrawString(number.ToString(), new Font("TimesNewRoman", 20), new SolidBrush(Color.Coral), 0, 0);
    
            MemoryStream memorystream = new MemoryStream();
    
            bmpOut.Save(memorystream, System.Drawing.Imaging.ImageFormat.Png);
    
            byte[] bmpBytes = memorystream.GetBuffer();
    
            bmpOut.Dispose();
    
            memorystream.Close();
    
            Response.BinaryWrite(bmpBytes);
    
            Response.End();
    
        }
    

    Thats it we are done with our Generate captcha image in asp.net. Very simple code to use, download democode and use it directly in your web application.

    Download Democode here---> CaptchaInAsp.net.zip Submit this story to DotNetKicks

    Read more...

    Thursday, October 28, 2010

    Display your logo on address bar

    Many times to make our site standout, we need to display our logo near address bar. There is very simple JavaScript which takes care of this. We need to put following code in tag HEAD tag.


    For each page of the website we need to add above code.
    demoico.ico is an icon file which we can use to display near address bar.
    We can also manipulate Header Section Dynamically, and change the icon for different pages. Submit this story to DotNetKicks

    Read more...

    Tuesday, October 19, 2010

    Transpose Data Table in .Net

    Many times while developing code we come to the point when we need to convert columns of table into rows and vice-verso. Transpose of DataTable in .net is very simple we just need to use following function, which creates one table named outputDataTable this table has been created with reference to inputDataTable.
    Though Transpose of Datatable in .net is easy task we need to understand that datatable is reference type, so we need make sure, one table is been transpose we dispose it after use or not.

    private DataTable GenerateTransposedTable(DataTable inputDataTable)
        {
            DataTable outputDataTable = new DataTable();
    
            // First column will remain the same
            outputDataTable.Columns.Add(inputDataTable.Columns[0].ColumnName.ToString());
    
            // Creating Columns form each corresponding rows
            foreach (DataRow inputRow in inputDataTable.Rows)
            {
                string newColName = inputRow[0].ToString();
                outputDataTable.Columns.Add(newColName);
            }
    
            // Add rows     
            for (int rowCount = 1; rowCount <= inputDataTable.Columns.Count - 1; rowCount++)
            {
                DataRow newRow = outputDataTable.NewRow();
                newRow[0] = inputDataTable.Columns[rowCount].ColumnName.ToString();
                for (int coulmnCount = 0; coulmnCount <= inputDataTable.Rows.Count - 1; coulmnCount++)
                {
                    string columnValue = inputDataTable.Rows[coulmnCount][rowCount].ToString();
                    newRow[coulmnCount + 1] = columnValue;
                }
                outputDataTable.Rows.Add(newRow);
            }
    
            return outputDataTable;
        }
    
    Submit this story to DotNetKicks

    Read more...

    Sunday, October 10, 2010

    Image Handling in Asp.net

    This article discuss about Image Handling, which in turns become important while handling high resolution images and displaying them in different sizes. Especially in case of E-commerce web applications, where admin can add different images of the same product so that users can get feel of the products. Also for image galleries where we need display same image in different sizes with zoom in and zoom out options.
    For above requirement following points should be considered
    • Image should not distorted when re-sized.
    • Quality of the image should remain same.
    • If image is of High resolution then while displaying image is different sizes; the image which loads in browser should be of relative size. E.g. suppose image resolution is of 2736x3648, and we resize such high resolution image in the size of 200x300, then the new small image should be of relative size, i.e. original image size is 3.34MB then while displaying in small size it should be reduced as per size.
    • All images displayed in browser should be of same time, i.e. user can upload images like JPEG, JPG, BMP, TIFF etc. and while displaying all images should be displayed in PNG format only.
    • End user should be able save image of size which he/she is able to see in browser. i.e. if browser is showing image with 200x300 size; user can save image by right clicking it, then the image which is getting saved should be of the 200x300 size only.
    Download DemoCode for better understanding of this article, you can also get to debug code while reading the article.
    The main file for all above operations is ImageHandler.ashx, its a http handler file, in that file following function takes care of resizing of image, just check it out.
    private Image ResizeImage(Image img, int maxWidth, int maxHeight)
        {
            if (img.Height < maxHeight && img.Width < maxWidth) return img;
            Double xRatio = (double)img.Width / maxWidth;
            Double yRatio = (double)img.Height / maxHeight;
            Double ratio = Math.Max(xRatio, yRatio);
            int NewX = (int)Math.Floor(img.Width / ratio);
            int NewY = (int)Math.Floor(img.Height / ratio);
            Bitmap imgCopy = new Bitmap(NewX, NewY, System.Drawing.Imaging.PixelFormat.Format32bppArgb);
            Graphics graphicsImg = Graphics.FromImage(imgCopy);
            graphicsImg.Clear(Color.Transparent);
            graphicsImg.InterpolationMode = System.Drawing.Drawing2D.InterpolationMode.HighQualityBicubic;
            //HighQualityBicubic gives best quality when resizing images
            graphicsImg.DrawImage(img,
                new Rectangle(0, 0, NewX, NewY),
                new Rectangle(0, 0, img.Width, img.Height),
                GraphicsUnit.Pixel);
            graphicsImg.Dispose();
            img.Dispose();
            return imgCopy;
        }
    
    Above function takes care of re-sizing of image, this function simply maintains the quality of image, and if image which we are re-sizing is less than in size than that we are asking for, this function simply returns the image. To avoid distortion of image on re-sizing we have maintained aspect ratio too.
    We are using ashx file as query string in Image source, which picks up image and render it in desired size code is as below.
    
    
    So remaining code of our Ashx file is as below
    string sImageFileName = "";
        string imageSize = "";
        int oldHeight, oldWidth, NewHeight, NewWidth;
    
        System.Drawing.Image objImage;
        
        public void ProcessRequest (HttpContext context)
        {
            sImageFileName = context.Request.QueryString["img"];
            imageSize = Convert.ToString(context.Request.QueryString["sz"]);
    
            if (imageSize == "Small") NewHeight = 50;
            else if (imageSize == "Thumb") NewHeight = 160;
            else if (imageSize == "Medium") NewHeight = 320;
            else if (imageSize == "Large") NewHeight = 640;
            
            objImage = System.Drawing.Bitmap.FromFile(System.Web.HttpContext.Current.Server.MapPath("Images//" + sImageFileName));
    
            oldHeight = objImage.Height;
            oldWidth = objImage.Width;
            NewWidth = oldWidth * (NewHeight / oldHeight);
    
            objImage = ResizeImage(objImage, oldHeight, NewHeight);
    
            MemoryStream objMemoryStream = new MemoryStream();
            objImage.Save(objMemoryStream, System.Drawing.Imaging.ImageFormat.Png);
            byte[] imageContent = new byte[objMemoryStream.Length];
            objMemoryStream.Position = 0;
            objMemoryStream.Read(imageContent, 0, (int)objMemoryStream.Length);
    
            context.Response.BinaryWrite(imageContent);
        }
     
        public bool IsReusable
        {
            get 
            {
                return false;
            }
        }
    
     
        private bool callback()
        {
            return true;
        }
    
    
    We have developed logic for image handling in mainly two files one is web user control i.e. webImageGallery.ascx and another is ImageHandler.ashx.
    Check out folder structure of the democode.
    Following Html code of imgGallery.ascx is, do refer democode.
    We have one function in imgGallery.ascx.cs file, which builds gallery kind of logic is named CreateImages(), and its code is as below, you can put your own logic for creating image gallery the way you want, I tired to keep logic simple. Once you build do solution check out source code of the gallery. Its simple JavaScript which changes image source on click on thumb image.
    protected void CreateImages()
        {
            int Count = 0;
            HtmlTableRow _htmlTableRow = new HtmlTableRow();
            _ProductTable.Rows.Add(_htmlTableRow);
    
            Directory.SetCurrentDirectory(imagePath);
    
            for (Count = 1; Count <= imageCount; Count++)
            {
                HtmlTableCell _htmlTableTd = new HtmlTableCell();
                _htmlTableRow.Cells.Add(_htmlTableTd);
                _htmlTableTd.Align = Convert.ToString(setImageAlign);
                Image _ThumbImage = new Image();
                _htmlTableTd.Controls.Add(_ThumbImage);
                if (Convert.ToString(setBorder) == "True")
                {
                    _ThumbImage.BorderStyle = BorderStyle.Solid;
                    _ThumbImage.BorderWidth = 1;
                }
                _ThumbImage.ID = ThumbImageName + Count;
                _ThumbImage.ImageUrl = "ImageHandler.ashx?img=" + imageNames[Count - 1] + "&sz=" + Convert.ToString(setThumbImageSize);
                _ThumbImage.Attributes.Add("onclick", "javascript:ImageButton_OnClientClick('" + _mainImage.ClientID + "','" + imageNames[Count - 1] + "','" + setMainImageSize + "');");
            }
    
            _mainImage.ImageUrl = "ImageHandler.ashx?img=" + imageNames[imageCount - (Count-1)] + "&sz=" + Convert.ToString(setMainImageSize);
        }
    
    Please check out variables in DemoCode, they are simply used as properties.
    Once websuercontrol is ready, we simply drag and drop it in Default.aspx page and set following properties of the imageGallery web user control.
    protected void Page_Load(object sender, EventArgs e)
        {
            ImageGallary.ImagePath = Server.MapPath("Images");
            ImageGallary.ImageNames = new string[] { "1_1.JPG", "1_2.JPG", "1_3.JPG", "1_4.JPG", "1_5.JPG" };
            ImageGallary.ImageCount = ImageGallary.ImageNames.Length;
            ImageGallary.SetImageAlign = _ImageAlign.Left;
            ImageGallary.SetMainImageSize = _ImageSize.Medium;
            ImageGallary.SetThumbImageSize = _ImageSize.Small;
            ImageGallary.SetBorder = _Border.True;
        } 
    Download Democode here---> ImageUserControl.zip Submit this story to DotNetKicks

    Read more...

    Wednesday, September 15, 2010

    Url Rewriting Made Easy - Article 3

    After implementing URL Rewriting there are certain issues which we need to tackle, so that URL rewriting logic will not affect web application. This is I am talking with reference to URL Rewriting for Search Engine Optimization, where we are preferring hackable URLs.
    This article is continuation of my previous articles on URL Rewriting.
    1. Url Rewriting Made Easy- Article 1 (Demo Code)
    2. Url Rewriting Made Easy- Article 2 (Demo Code)
    Basic things which I considered while developing logic was, Url Rewriting should be very simple to understand and implement. And it should be considered while developing the web application and not after completing the development.
    What happens when we do URL Rewriting? On the client side i.e. on Browser we display URL which is hackable (i.e. Easy to understand and can be remembered easily, which also directly or indirectly displays directory structure.). On server side page get redirected to some other page using query string and rest of the operations can be performed in normal way. But There is one serious thing which we need to consider, normally when we Use Images and JavaScript files in HTML logic we tend to give relative path; and this path is picked by browsers to display images and include JavaScript files in HTML code.
    In case of URL Rewriting we have discussed in Article 1 and Article 2, we need to keep work around for images and JavaScripts. As per the logic Raw Urls (i.e. Hackable URL) is being displayed and used by the browser, but for displaying Images which belongs to different folder we need to use fully qualified urls.
    USE FULLY QUALIFIED URLS FOR IMAGES AS WELL AS TO INCLUDE JAVA SCRIPT FILES, SO THAT URL REWRITING CAN WORK. You can always go for Image Handlers or manipulate Image Urls by making Images server side controls. for including JavaScripts you can either Manipulate the Head Section Dynamically or use your own logic. Submit this story to DotNetKicks

    Read more...

    Wednesday, September 8, 2010

    Handling Head Section Dynamically

    When it comes to Search Engine Optimization there are few modifications we need to do in Header Section. If a web application has simple structure then handling Head Section is an easy task. But consider an application like E-Commerce store where there is huge collection of different kind of products which belongs to various categories and sub categories. In that case we have to manipulate many things for every request depending on the product, its details, depending on category and subcategory. ( URL Rewriting is one the important thing for Search engine optimization, which I have already discussed in some articles, Article 1, Article 2).
    Head section also plays an important role for Search Engine Optimization, in this article we will discuss all elements which matters in HEAD section and can be handled dynamically in asp.net.
    • Handling Page Title: Page title can contain many things explaining details or abstract about the Product or about the current page which is being displayed for some purpose. User might click on some link and page is being redirected to display some product or category. In that case Page Title should also be change accordingly. This can directly be handled as follow


      protected void Page_Load(object sender, EventArgs e)
          {
              this.Header.Title = "This is Demo Title";
              //we can also use following
              //Page.Header.Title or Page.Title or this.Title
              //Can also apply some switch case, depending on Query String.
              //depending on product or category details
          }
    • Adding JavaScript in Head Section: We can either load direct JavaScript in HEAD section or we can add JS file in HEAD Section. check out following codes


      protected void Page_Load(object sender, EventArgs e)
          {
              HtmlGenericControl HTMLControl = new HtmlGenericControl();
              HTMLControl.TagName = "script";
              HTMLControl.Attributes.Add("type", @"text\javascript");
              HTMLControl.InnerText = @"alert('Insert Your JavaScript as String HERE instead of this Alert')";
              this.Page.Header.Controls.Add(HTMLControl);
          }

      Also we can add JavaScript file reference as below.


      protected void Page_Load(object sender, EventArgs e)
          {
              HtmlGenericControl HTMLControl = new HtmlGenericControl();
              HTMLControl.TagName = "script";
              HTMLControl.Attributes.Add("type", @"text\javascript");
              HTMLControl.Attributes.Add("src", "yourJSFile.js");
              this.Page.Header.Controls.Add(HTMLControl);
         }
    • To add content Meta Type in HEAD Section we can use following code.


      protected virtual void AddMetaContentType()
      {
      HtmlMeta meta = new HtmlMeta();
      meta.HttpEquiv = "content-type";
      
      meta.Content = Response.ContentType + "; charset=" + Response.ContentEncoding.HeaderName;
      
      Page.Header.Controls.Add(meta);
      
      }
      
    • To Add Meta Section, e.g. For Keyword and Description we can use following function

      protected void AddMetaTag(string name, string value)
        {
         if (string.IsNullOrEmpty(name) || string.IsNullOrEmpty(value))
          return;
      
         HtmlMeta meta = new HtmlMeta();
         meta.Name = name;
         meta.Content = value;
         Page.Header.Controls.Add(meta);
        }
      
    Submit this story to DotNetKicks

    Read more...

    Monday, August 30, 2010

    Url Rewriting Made Easy - Article 2

    Before I explain what is URL Rewriting and how simple it is to go for, kindly ready my previous article on same topic i.e. Url Rewriting Made Easy - Article 1, in this article I have explained some basics about URL Rewriting.
    The very obvious question rises is, why should you go for URL Rewriting?
    Why Should I go For rewriting URL?
    • Short URLs
    • easy to type & easy to remember URLs
    • Site Structure is Visible through URLs
    • URLs are precise and which won't change
    • URLs WHICH MAKE SENSE for End USER as well as for SEO purpose
    Now if we look at above points as a web developer then we are very sure that these all things prone to change, we need to pass parameters and change directory structure of the web application. If the web application is very huge then managing above things is a headache.
    Lets discuss the case of online shopping; "As a developer for e-commerce application or for online super market projects"; as per above bullet points we need separate URL for followings
    • Every Product should be identified separately
    • Category as well as subcategory should have separate identity
    • Price Range wise
    • Miscellaneous
    • Etc...
    Basically one should be able to maintain and manage URLs as per requirement and need.
    Now there is a trick, we have to show one URL on browser and internally use different url. Yes we are showing something which is readable and easy; which satisfies all bullet points listed above, but internally we can manage our logic our way rather in traditional way... 
    e.g. we are displaying url say "http://www.mysite.com/product1" and we can internally use url "http://www.mysite.com/default.aspx?category=product1" its quite logical.Now the ultimate question arises is how to achieve this? So lets start building the logic. Check out following diagram, it is a logical flow of URL Rewrite operation.


    So the very important thing we need to rewrite url is HTTP handlers, but before developing this handler we need to decide what URLs we should build for web application. For this Demo Code we will develop URLs which will be either Datewise as well as Product Namewise or show all products. Lets Consider we have following URLs which internally redirects to Default.aspx page with query string.
    • http://www.yoursite.com/PRODUCTS.aspx
    • http://www.yoursite.com/2010.aspx
    • http://www.yoursite.com/2010/08.aspx
    • http://www.yoursite.com/2010/08/24.aspx
    Above links will be internally redirect to Default page in respective order as
    • http://www.yoursite.com/default.aspx?products=allproducts
    • http://www.yoursite.com/dafault.aspx?year=2010
    • http://www.yoursite.com/dafault.aspx?year=2010&month=08
    • http://www.yoursite.com/default.aspx?date=2010-08-24
    So Rewriting of URL gives us flexibility of having different URLs for different kind of query string, in above example we have four different URLs pointing toward same page. I think this is the beautiful part, search engines see four different, readable URLs but we can handle data in traditional way. (For easy Reference check out DemoCode)
    This URL module is same as Article 1 but RewriteModule.cs file is added. Function of PostBack.Browsers is similar i.e. to maintain URL during postbacks.
    Now we will develope Code for RewriteModule.cs, this class file implement IHttpModule interface, whose code is as below.
    namespace Rewrite
    {
        public class RewriteModule : IHttpModule
        {
            public RewriteModule()
            {
                //
                // TODO: Add constructor logic here
                //
            }
    
            #region IHttpModule Members
    
            public void Dispose()
            {
                //  throw new NotImplementedException();
            }
    
            public void Init(HttpApplication context)
            {
                //   throw new NotImplementedException();
                context.BeginRequest += new EventHandler(RewriteModule_BeginRequest);
    
            }
    
            void RewriteModule_BeginRequest(object sender, EventArgs e)
            {
                // throw new NotImplementedException();
                HttpContext context = ((HttpApplication)sender).Context;
                string path = context.Request.Path.ToUpperInvariant();
                string url = context.Request.RawUrl.ToUpperInvariant();
    
                path = path.Replace(".ASPX.CS", "");
                url = url.Replace(".ASPX.CS", "");
    
                if (url.Contains("/PRODUCTS/"))
                {
                    RewriteProduct(context);
                }
                else RewriteDefault(context);
            }
    
            #endregion
    
            private static readonly Regex YEAR = new Regex("/([0-9][0-9][0-9][0-9])", RegexOptions.IgnoreCase | RegexOptions.Compiled);
            private static readonly Regex YEAR_MONTH = new Regex("/([0-9][0-9][0-9][0-9])/([0-1][0-9])", RegexOptions.IgnoreCase | RegexOptions.Compiled);
            private static readonly Regex YEAR_MONTH_DAY = new Regex("/([0-9][0-9][0-9][0-9])/([0-1][0-9])/([0-3][0-9])", RegexOptions.IgnoreCase | RegexOptions.Compled);
    
            private void RewriteDefault(HttpContext context)
            {
                string url = context.Request.RawUrl;
    
                if (YEAR_MONTH_DAY.IsMatch(url))
                {
                    Match match = YEAR_MONTH_DAY.Match(url);
                    string year = match.Groups[1].Value;
                    string month = match.Groups[2].Value;
                    string day = match.Groups[3].Value;
                    string date = year + "-" + month + "-" + day;
                    context.RewritePath(@"~/default.aspx?date=" + date, false);
                }
                else if (YEAR_MONTH.IsMatch(url))
                {
                    Match match = YEAR_MONTH.Match(url);
                    string year = match.Groups[1].Value;
                    string month = match.Groups[2].Value;
                    string path = string.Format("default.aspx?year={0}&month={1}", year, month);
                    context.RewritePath(@"~/" + path, false);
                }
                else if (YEAR.IsMatch(url))
                {
                    Match match = YEAR.Match(url);
                    string year = match.Groups[1].Value;
                    string path = string.Format("default.aspx?year={0}", year);
                    context.RewritePath(@"~/" + path, false);
                }
                else
                {
                    context.RewritePath(url.Replace("Default.aspx", "default.aspx")); 
                }
    
            }
    
            private void RewriteProduct(HttpContext context)
            {
                string path = "default.aspx?products=allproducts";
                context.RewritePath(@"~/" + path, false);
            }
        }
    }
    Lets understand this code first. We have divided logic in two functions, one handles Dates using Regular Expression and other simple handles Product category. i.e. RewriteDefault and RewriteProduct functions. Both functions can be static. To rewrite URL we are using context.RewritePath function, and we have added one eventHandler for context.BeginRequest; i.e.RewriteModule_BeginRequest. Here I assume that the reader is aware about implementation of HTTPMODULE.
    After this we will develop index.aspx page, which looks like following
    HTML side of Index.aspx is as below
    Please Refer HTML of index.aspx, due to limitation of HTML rendering and Blogger compatibility I am not able to display code here. (Please refer html of index.aspx, check demo code.)
    index.aspx page uses four URLs discussed above and redirects it self Default.aspx. Now HTML of Default.aspx and Code Behind are as below
    This is Default.aspx Page
    Here you can see Messages

    Code Behind is as below
    protected void Page_Load(object sender, EventArgs e)
        {
            if (!string.IsNullOrEmpty(Request.QueryString["date"])) 
            {
                //Write your logic Instead of following code.
                message.InnerText = "Logic For fetching data as per Date: " + Request.QueryString["date"];
            }
            else if (!string.IsNullOrEmpty(Request.QueryString["year"]) && !string.IsNullOrEmpty(Request.QueryString["month"])) 
            {
                //Write your logic Instead of following code.
                message.InnerText = "Logic For fetching data as per Year and Month: " + Request.QueryString["year"] + "/" + Request.QueryString["month"];
            }
            else if (!string.IsNullOrEmpty(Request.QueryString["year"])) 
            {
                //Write your logic Instead of following code.
                message.InnerText = "Logic For fetching data as per Year: " + Request.QueryString["year"];
            }
            else if (!string.IsNullOrEmpty(Request.QueryString["products"])) 
            {
                //Write your logic Instead of following code.
                message.InnerText = "Logic For fetching data for all Products: " + Request.QueryString["products"];
            }
        }
    In web.config file (as per HTTPMODULE implementation) we add following code


    We are done with our rewrite url logic, for handling Postbacks check out the logic written in "HandlePostBacks.cs" and "PostBack.browser" files. This logic is already explained in Url Rewriting Made Easy - Article 1
    Download Demo codes
    Submit this story to DotNetKicks

    Read more...
    Sunday, August 22, 2010

    Url Rewriting Made Easy - Article 1

    Rewriting of URL is one of the Major point in terms of Search Engine Optimization as well as in terms of Readability and usability. 
    We should go for rewriting of URL because of following reasons
    1. Search Engines Recognizes different URLs.
    2. Same Page can be executed with different unique URLs.
    3. We can also introduce our keywords in the URLs.
    In this article we will discuss very preliminary way to generate unique URL which internally can target to same page. We will also discuss how to maintain the URL during postbacks. We have to consider postback case because though we manage to redirect to some URL which is rewritten, during postbacks it again changes to the actual URL.
     
    In general Our URLs looks like below
    http://www.yourSite.com/products.aspx?category=Kids
    http://www.yourSite.com/products.aspx?category=Science
    http://www.yourSite.com/products.aspx?category=Biology
    We are going to use a less used feature of Asp.Net i.e. "Request.PathInfo" using which we will able handle
    URLs which are as below
    http://www.yourSite.com/products.aspx/Kids
    http://www.yourSite.com/products.aspx/Science
    http://www.yourSite.com/products.aspx/Biology
    This is one of the simplest approach to Handle URL Rewriting.  Now Lets start implementing it, before we go ahead check out the folder structure of the DemoCode for this article which is as below.
    Lets Discuss one File at a time
    • Default.aspx: This file contains simple Div Tag with 3 links point to Product.aspx with desired URLs. Check out following code for the same. Check out URLs.


    • Product.aspx: HTML of Product.aspx contains following simple code.


      code behind of Product.aspx is as follows


      protected void Page_Load(object sender, EventArgs e)
          {
              switch (Request.PathInfo.Substring(1))
              { 
                  case "Kids":
                      Response.Write("This is Kids Section");
                      break;
                  case "Science":
                      Response.Write("This is Science Section");
                      break;
                  case "Biology":
                      Response.Write("This is Biology Section");
                      break;
              }
      
              Response.Write("
      
      
      Check out the URL");
          }
          protected void Button_Click(object sender, EventArgs e)
          {
              Response.Write("URL is Not Changing After PostBack");
          }

      This is very simple way to implement and understand which category is being called. upto this point code can work very well. But to make sure that on post back also i.e. on button click on Product.aspx page same URL should be maintained, we have to write Control Adapter which we have written in "HandlePostBacks.cs" file
    • HandlePostBacks.cs:  In this file we have overriden Render function of Control Adapter class to rewrite the Raw URL during postbacks. check out following code.


      public class HandlePostBacks : System.Web.UI.Adapters.ControlAdapter
      {
          protected override void Render(HtmlTextWriter writer)
          {
              base.Render(new RewriteForPostBack(writer));
          }
      }
      
      public class RewriteForPostBack : System.Web.UI.HtmlTextWriter
      {
          public RewriteForPostBack(HtmlTextWriter writer) : base(writer)
          {
              this.InnerWriter = writer.InnerWriter;
          }
      
          public RewriteForPostBack(System.IO.TextWriter writer) : base(writer)
          {
              base.InnerWriter = writer;
          }
      
          public override void WriteAttribute(string name, string value, bool fEncode)
          {
              if (name == "action")
              {
                  HttpContext context;
                  context = HttpContext.Current;
                  value = context.Request.RawUrl;
                         }
              base.WriteAttribute(name, value, fEncode);
          }
      }

      Now we have almost done with our logic, now what remains is to register above adapter so that it get called automatically. For this we will write logic in "postback.browser" file

    • Postback.browser: We write simple logic which tells .net which adapter control should be used, check following code.


    And we are done with the implementation DOWNLOAD demo code and check it out, very simple and can implement easily on other pages.
    Download Demo Code here --> UrlRewitting-Simple Approach 1.zip Submit this story to DotNetKicks

    Read more...

    Saturday, August 14, 2010

    Solved: Could not load type 'System.Web.UI.ScriptReferenceBase'

    I came across following error while using AjaxToolKit 3.5, well it is a very common error I think, and I got the solution too.
    Could not load type 'System.Web.UI.ScriptReferenceBase' from assembly 'System.Web.Extensions, Version=3.5.0.0, Culture=neutral, PublicKeyToken=31bf3856ad364e35'.
    Above error occurs because of the presence of  asp:ToolkitScriptManager, just replace this toolkitscriptManager with normal asp:ScriptManager
    This simply works, no need to get panic about this error :)

    Submit this story to DotNetKicks

    Read more...

    Friday, August 13, 2010

    Page Methods

    This article is all about the page methods and their usage. PageMethods is the part of Ajax.net and Script Manager.
    MS Ajax gives us ability to directly create a web method on aspx page. And also enable to directly call this web method from the page. This method is termed as Page Method.
    This is very easy way to implement Ajax functionality on the page. Like ICallback event handler here also we need to manipulate the string.
    Page Method works simply as Web Methods
    Script Manager Play critical role for the use of Page Methods, we need to set EnablePageMethods attribute to true.

    To use web method attribute in Aspx page, use namespace
    using System.Web.Services
    Page Method should be static, as per the design by MS. So our web method (Page Method) will be as follows.

    Now to call above method from client script we need to add PageMethods before the method name
    PageMethods.HelloUser("Test User");
    This will simply call the Method defied in Page, i.e. .cs file
    Many times we need to handle different methods in different way, so in that case we need some special mechanism to handle the response from the server. We may also need to handle method failure errors in some customized way; we can also achieve this by adding extra parameters in PageMethods call.
    In short we can add callback methods for successful invocation of pagemethods as well as for the failure of the pagemethod.

    Basic Method prototype is
    PageMethods.MethodName([para1,para2,…],[OnSucceeded, defaultFailedCallback,userContext]);

    Above code work perfectly for normal scenario.
    There might be possibility that we create our own JavaScript wrapper class, which internally uses PageMethods in that’s case, we might have following requirements.
    • Set defaultFailedCallback
    • Set defaultSucceededCallback
    • get defaultFailedCallback
    • get defaultSucceededCallback
    • set timeout
    • get timeout
    Let’s say we have defined default Failed and Succeeded callbacks. Thus whenever we call some method like PageMethod.HelloUser(username), now if this method call completes its execution successfully our default Succeeded callback function will be called automatically. If method throws some error or failed, default Failed callback function will be called.
    Also we need to call some already existing PageMethods but from some other pages; then in that case we should be able to set the path of the page in which methods are defined.
    Considering above requirement we can modify the code as below.

    With this understanding we can use pageMethods very effectively to handle static Page methods.

    Download Demo Code here --> PageMethod3.5.zip

    Submit this story to DotNetKicks

    Read more...

    ICallback Event Handler

    This article will explain the use of “ICALLBACKEventHandler” in asp.net 2.0.
    About ICallbackEventHandler:
    ASP.NET 2.0 introduces an interface ICallbackEventHandler (System.Web.UI.ICallbackEventHandler) to allow asynchronous communication with the server. Unlike Postback, in Callback only user defined information is sent back to the server.
    ICallbackEventHandler uses DoCallback event to send user defined data to server (instead of postback event), and return the String to client; on client side JavaScript manipulates the string. This interface implements two functions on server side (i.e. c# or vb) and we need to implement two functions on client side i.e. in JavaScript.(You can DOWNLOAD demo Code for Reference)
    Use of ICallbackEventHandler:
    To use ICallbackEventHandler, we need to impliment it on the page or on the User control. The code will be look like

    Once we impliment this interface; we will have to play with 4 functions, two client side functions i.e. java script function, and two server side function i.e. c# (in this case).
    As from ICallbackEventHandler, we have to use two functions namely (These functions or methods belongs to ICallbackEventHandler interface. C#)
    1.public void RaiseCallbackEvent(String eventArgument)
    2.public String GetCallbackResult()
    RaiseCallbackEvent function gets call automatically whenever there is a CallbackEvent. And after this function 2nd function i.e. GetCallbackResult get called automatically.
    2nd function returns a string to client.
    How to raise a CallbackEvent?
    To raise a callback event from client side we will use javascript function.
    There will be two javascript functions whos functionality is as follows
    1.Function which will call RaiseCallbackEvent, i.e. raise a callback event.
    2.Function which will handle the response from the server. This function will be called automatically after GetCallbackResult(). I.e. the string returned by GetCallbackResult will appear in JavaScript as input to this function.
    We will go on developing the code for better understanding of ICallbackEventHandler.
    1.Create ASPX page design as follows

    In above design “CheckForTimeZone()” in the button tag, is a javascript function, we will add it latter, under javascript tag.
    Here button is a HTML control.
    2.After this; we will write following JavaScript to the Aspx page.

    You can just copy paste the code.
    In above code “CallServer(selectedItem, "")” will be responsible for calling “RaiseCallbackEvent” on server side.
    And “ReceiveServerData(retValue)” function gets called by
    public String GetCallbackResult().
    To make above code work the way we want; we will write code in aspx.cs file.
    3.We will add C# code i.e. ASPX.Cs file

    Please go through the above code line by line and then continue with following explanations.
    String cbReference = Page.ClientScript.GetCallbackEventReference(this, "arg", "ReceiveServerData", "context");
    If we debug the code “cbReference” will contain “WebForm_DoCallback('__Page',arg,ReceiveServerData,context,null,false)”;
    Observe the string, WebForm_DoCallback contains ReceiveServerData, it’s a java script function we have written in step 2.

    Again “callbackScript” will contain some string. Actually it is a JavaScript function which we will register to the client page. Using

    Using above line of code we have registered our CallServer function to the page.
    In above point we are registering the CallServer function. Now again see the 2nd point we are passing selected item of the Dropdown list to this function.
    i.e. CallServer(selectedItem, "");
    if you see the source code of the page then CallServer function will appear as follows

    This CallServer function is responsible to raise the callbackEvent i.e. RaiseCallbackEvent(String eventArgument), and the “arg” will be appeared as eventArgument.
    4.We will add RaisecallbackEvent and GetCallbackResult.
    Add following code to aspx.cs file


    Download Demo Code here --> ICallbackEventHandler.zip Submit this story to DotNetKicks

    Read more...

    Thursday, August 12, 2010

    Asp.Net - Handling Long Running Process in Web Development

    Sometimes in web development we need to run long processes. During such time we come across browser request time out issues. Whether we use Ajax or not, if process is very long running, browser will through time out error. Also there are some processes which needs to be initiated in background, then user can redirect to other page. Once the Process is over user can retrieve the data from long running process.
    In case of Ajax.Net if we use script manager then also we have to define time out for the request. Imagine the scenario in which we can’t predict what time the process will take to execute e.g. it may take 5-7 minutes in such cases browser may give timeout error.
    In this article we will discuss about this issue and how to use Ajax to handle long running process; using IAsyncResult, ICallbackEventHandler.
    Concept behind Logic
    Web application is a client-server architecture, so when client hits server; server will reply. If long process is running on the server, then we need some mechanism by which we will come to know that long process is over. And using Ajax we can very well do polling. But when on server side, long running process is going on , rest of the code will not get execute unless that process overs. To handle this issue we will use IAsyncResult . Using this interface and delegates we will able to run asyncronous process on server side.
    For this logic is we invoke one method on server side and continue with other tasks; once first method is over it will automatically call another server method so that we can update some parameters say VAR1 and VAR2. And using ICallback we will check for VAR1 and VAR2, as soon as we get updated values, we will change status of long running method on client. (In Demo code we have used Session Variable Named result )
    About IAsyncResult, delegate and AsyncCallback in our code (Refer DEMO CODE for better understanding)
    Classes which support asynchronous operation or method implements IAsyncResult interface. IAsyncResult objects are passed to methods invoked by AsyncCallback, when an asynchronous operation overs. Classes which supports AsyncCallback in their methods return object of IAsyncResult; check out FileStream.BeginRead and FileStream.EndRead, these methods support AsyncCallback hence return type is IAsyncResult. Same is true for BeginGetRequestStream method of WebRequest.
    If we see the parameters in these method then there is one parameter “AsyncCallback callback”; now callback is the method which gets called once Async method is over. In our code this method is represented by CallBackMethod function.
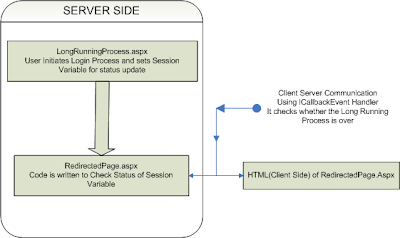
    PROCESS FLOW(LOGICAL FLOW)
    In our this code, we have used async method of delegate, i.e. BeginInvoke and EndInvoke.
    On server side, we have used delegate and on button click event function named DoSomething() get called. This function take cares of LongRunningMethod registration for delegate and invoking of LongRunningMethod; this will be asynchronouse invokation on server side. While invoking LongRunningMethod we register AsyncCallback method i.e. CallBackMethod. In CallBackMethod we get object of IAsyncResult class as paramter. In this method we have just called EndInvoke method of delegate.
    CallBackMethod method can be used to do other operations which may be dependent on the LongRunningMethod.
    We will write our LongRunningMethod,that will be as follows

    Above methos is simple implemtation for longrunning method.
    We will declare delegate for above function , parameters for delegate and method should be same.
    private delegate void LongRun(string name);
    Implementation of Async process on server side

    On button click event we will call DoSomething function.

    Long.BeginInvoke in DoSomething will invoke LongRunningMethod method.
    While implenting this just check parameters for BeginInvoke in .net.
    CallBackMethod get called automatically after LongRunningMethod. CallBackMethod is used to end the invokation of delegate.
    Upto this point we were discussing about Asynchronouse method invocation on server side. Now we will talk about Ajax check using ICallbackEventHandler for LongRunningMethod. (Note: if your are new to ICallbackEvent Handler, check out my article on ICallback, you can also download ICallback Demo. )
    On Button Click in Above code (i.e. in LongRunningProcess.aspx page in demo) we initiate Long Running Process and Redirect to RedirectedPage.aspx. On Redirected Page we use ICallback to check status of LongRunning Process. We have used Session["result"] to check the status. Please make sure that you are understanding the code.
    Using ICallbackEventHandler client browser polls to server for chekcing whether LongRunningMethod is over or not; in predefined time interval. If the process is over we send SUCCESS to client side. So if response from server singnifise that the LongRunningMethod is over we update the client. (RedirectedPage.aspx takes care of the status check, on this page we can have our other elements and other business logic, while in backend we can check for status of longrunning process.)
    Here I assume that you are aware about the ICallbackEvent Handler, if not then please go through my article related to ICallback.
    Download Demo Code For Free --> LongRunningProcess.zip , ICallbackEvent Handler
    Submit this story to DotNetKicks

    Read more...

    Tuesday, August 10, 2010

    Different ways of web page Redirect in Asp.Net

    As a website developer many times we come across situation where we need to redirect pages, as there are many ways to redirect pages in asp.net and in HTML as well; one should know the difference between various web page redirect methods.
    In this article we will discuss various web page redirecting methods we can use in asp.net

    1. Hyperlink: This is a traditional way of web page redirect which can use with HTML TAG i.e "A" tag. This is a static link on a page, which can be used as a tag with various style attributes. Also we can put data in opening and closing tag of "A". Asp.Net provides Hyper Link control, which is a class inherited from Webcontrol class. This control needs user to click explicitly on link for web page redirect.


      There are many attributes and events which are associated with hyperlink control, which can be used for many purposes.

      Hyperlink has following characteristics
      • New request is performed on Target Page.
      • Current page information doesn't get passed. Need to use query string to pass parameters
      • User Need to Initiate the web page transfer request.
      • Redirects to any page, not only restricted to current domain.
      When to Use
      • For navigation without any processing, e.g. Menu's list Items
      • When user should control the navigation.
    2. CrossPagePostBacks :By default, buttons in an ASP.NET Web page post the page to itself. i.e. it simply acts as a submit button of HTML. Where as Cross-page posting enables us to change the style of submitting the page, we can configure a button on an ASP.NET Web page to post the current page to a different page. Typically in multi-page forms, we can use such buttons on the page to move to the next and previous pages of the form.

      Though cross page posting is similar to hyperlinks, in cross page posting, the target page is invoked using an HTTP post command, which sends the values of controls on the source page to the target page. In addition if source and target page are in the same web application then the target page can access public properties of the source page. You can check out the article on cross page post by, click on CROSS PAGE POSTBACK
      Hyperlink has following characteristics
      • Post current Page Information into Target Page.
      • Makes Post information available into target page.
      • User Need to Initiate the cross page postback request.
      • Redirects to any page, not only restricted to current domain.
      • Enables the target page to read public properties of the source page if the pages are in the same Web application.
      When to Use
      • To pass current page information to the target page (as in multi-page forms).
      • When user should control the navigation.
    3. Response.Redirect: This is simple HTTP redirection we can directly use in code behind. very simple to use  When we use Response.Redirect the browser issues a new request to the target server in the form of an HTTP GET request. Response.Redirect is same as form submit in HTML, it does exactly same, actually in HTML response.redirect come as submit only. This method passes the server elements using query string. We can always use this method in code behind with our logic to redirect to other page(s).
      Hyperlink has following characteristics


      • Performs a new HTTP GET request on the target page.
      • Passes the query string (if any) to the target page. In Internet Explorer, the size of the query string is limited to 2,048 characters.
      • Provides programmatic and dynamic control over the target URL and query string.
      • Enables you to redirect to any page, not just pages in the same Web application.
      • Enables you to share information between source and target pages using session state.

      When to Use
      • For conditional navigation, when you want to control the target URL and control when navigation takes place. For example, use this option if the application must determine which page to navigate to based on data provided by the user.
    4. Server.Transfer: In case of Server.Transfer, server simple transfers the current source page context to the target page. The target page then renders in place of the source page. To use Server.Transfer, source page and target page should be in the same web application. When we use transfer method target page can read control values and public property values from the source page. Transfer between source and target pages happens on the server, because of this the browser has no information about the changes page, and it retains all information about the original i.e. source URL. Browser history doesn't get update to reflect the transfer. This is the best strategy to keep URL hidden, if user refresh the page he/she will be redirected to source page rather than new transferred page.
      Server.Transfer has following characteristics
      • Instead of source page control is transfered to new page which get renders in place of source
      • Redirects only to target pages that are in the same Web application as the source page.
      • Enables us to read values and public properties from source page.
      • Browser information Does not update with information about the target page. Pressing the refresh or back buttons in the browser can result in unexpected behavior.
      When to Use
      • For conditional navigation, when you want to control when navigation takes place and you want access to the context of the source page.
      • Best used in situations where the URL is hidden from the user.
    Submit this story to DotNetKicks

    Read more...